Intro
I don't use EAGLE PCB often enough and subsequently forget how to use it between uses. To that end, I'm writing this quick example/tutorial to remind myself how to use EAGLE. Maybe you can make use of this too. Also maybe one day I'll be using it enough to become a pro. Until then...
The circuit I'm modeling is a 3-wire, quarter bridge strain gauge, Figure 1, attached to an INA125 instrumentation amplifier, Figure 2. The three wire circuit shown in Figure 1 minimizes any offset resistance due to resistance in the wires. The INA125 is used because it has both a clean 10V reference voltage to power the quarter-bridge and a single resistor to control the amplifier's gain.
 |
| Figure 1. 3-wire quarter bridge circuit. E is the excitation, and e_o is the voltage measurement. |
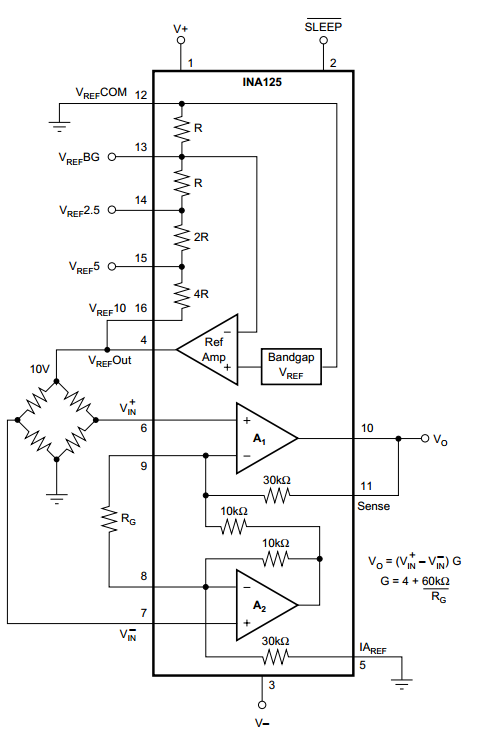 |
| Figure 2. INA125 instrumentation amplifier. Notice the wheatstone bridge on the left side. |
Setting up EAGLE
First, make sure you have the latest version of EAGLE installed.
Next, you need to download some helpful EAGLE libraries. (The lack of native easy-to-use libraries is one of my biggest criticisms of EAGLE.) Element14, Adafruit, and Sparkfun all provide additional libraries that are a little simpler to navigate. Read this link on how to install your libraries.
I also strongly recommend copying all useful libraries to a separate folder so you can find them easier in the future. For example, I've created a folder called 'JohnsUsefulLibraries', and inside, I have a library for throughhole resistors, throughhole ICs, throughhole trimmers, etc. To do this, File->New->Library and save it accordingly. Next, right click on the new library and click open. Then find the schematic (which should be linked to all of the related parts) in other libraries, right click on it, and click Copy to Library. Save the new library.
EAGLE Step-by-step procedure to create parts
Schematic
Start with the schematic.
- Look through your library and place all parts that you'll need.
- Give each part a Name and Value.
- Move/rotate/mirror/etc each part until you have it where you want it.
- Click "Net" and connect all parts that need to be connected.
- Under the supply library, you'll find ground and power symbols. These are great because they reduce the clutter on your schematic while still being "connected". Use these and make sure all relevant power or ground symbols have the same name (e.g. all ground symbols should be Named GND) to keep them connected.
- Once done, click "Generate/switch to board"
Figure 3 shows my schematic. I'm using 3x1 headers as place holders for my standoff connectors (which I couldn't find the part for).
 |
| Figure 3. EAGLE PCB layout of quarter-bridge strain gauge circuit. |
Board
- Turn Grid on.
- Move components about where you want them.
- Click ratsnet to redraw the "unconnected" lines.
- Ground plane
- Resize board to something reasonable.
- Change to "Top" layer
- Draw polygon around the outside of the board. Red line should become dotted when connected.
- Change polygon name to GND (name of ground connection).
- Click ratsnet button.
- Cleanup silkscreen (optional)
- Smash names.
- Move and delete desired values.
- Set autorouting values.
- Edit -> Net classes.
- Change traces to maybe 12mil, drill to maybe 20mil, and clearance to maybe 10mil.
- Autorouting
- Click autorouter.
- Continue.
- Optionally, place each route manually.
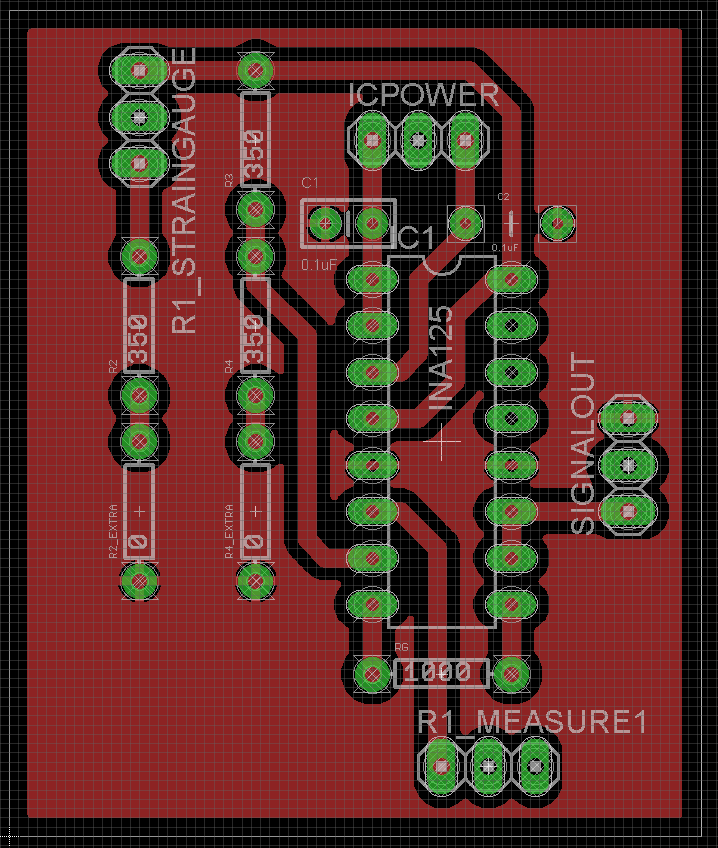 |
| Figure 4. EAGLE PCB board layout. The 0 ohm resistors are there in case I need a second resistor to better balance the bridge circuit. If I don't need it, I'll just jump it. |
Wrapup
Depending on how you want to have your board developed, there will be additional steps. I'm presently using a Vinyl cutter and Ferric Chloride to make mine. For details on this process, see my tutorial on Vinyl Etching PCB Boards.
My final product is shown below.
My final product is shown below.


Resources
INA125 - Instrumentation amplifierEAGLE tutorials created by Jeremy Blum