Wednesday, November 5, 2014

Pointwise - Converting 2D Plot3d grid files to 2D Plot2d

Introduction
I was trying to use Pointwise to generate Plot2d grids, and I discovered that Pointwise appears to be only capable of generating Plot3d grids.  I couldn't find a solution inside of Pointwise so I wrote the Matlab script below to address it.

A quick explanation on the difference between 2D-Plot3d and 2D-Plot2D grids.  When generating a 2D grid in Pointwise, the program outputs a z-coordinate for each point (which is always 0).  Here's an example of the difference between the 2D-Plot3d and 2D-Plot2d grid file:

2D-Plot3d
2
30 30 1
59 30 1
...xdata(block 1)...
...ydata(block 1)...
...zdata(block 1) = 0...
...xdata(block 2)...
...ydata(block 2)...
...zdata(block 2) = 0...

2D-Plot2d
2
30 30
59 30
...xdata(block 1)...
...ydata(block 1)...
...xdata(block 2)...
...ydata(block 2)...

Why does this matter?  

First, Vulcan doesn't care.  When importing the grid file into vulcanig, the user can specify if it is a Plot3D or Plot2D file, and Vulcan will take care of it.

However, TecPlot DOES care.  Because the output of vulcan is in a true 2D format, TecPlot cannot plot the solution against the 2D-Plot3D grid.  It needs the 2D-Plot2D grid.  


The code

The following code is written in MATLAB

clc; close all; clear all;

%% input
inputFile=['C:\Users\John\Documents\PointwiseExample','\','expansionChamber.x'];
outputFile='grid.x';

%% read in 2D(x=m,y=n,z=1) data
A0 = importdata(inputFile);  %raw data
A=A0;  %raw data to be trucated

% number of blocks in data
numBlocks=A(1);

% grab matrix sizes from the header
for i = 1:numBlocks
    m(i)=A(2+(i-1)*3);
    n(i)=A(3+(i-1)*3);
end

% throw away header info from A
A=A(2+numBlocks*3:end);

% grab x and y data from A and ignore z
for i = 1:numBlocks
    N=m(i)*n(i);
    x{i}=A(1:N);
    A=A(N+1:end);
    y{i}=A(1:N);
    A=A(N+1:end);
    A=A(N+1:end); %delete z
end


%% plot data
figure; hold on
colors=['brkg'];
for i = 1:numBlocks
    plot(x{i},y{i},[colors(i),'+'])
end


%% write 2D(x=m,y=n) data (with the single z value stripped out)
fileID = fopen(outputFile,'w');

% write number of blocks
fprintf(fileID,[num2str(numBlocks) '\r\n']);

% write matrix sizes for each block
for i = 1:numBlocks
    fprintf(fileID,[num2str(m(i)), '\t', num2str(n(i)), '\r\n']);
end

% write x and y data for each block
for i = 1:numBlocks
    p=x{i};
    for k=1:2
        if k==1
            p=x{i};
        else
            p=y{i};
        end
        
        while(length(p)>=4)
    %         fprintf(fileID,[num2str(p(1)), '\t', num2str(p(2)), '\t', num2str(p(3)), '\t',num2str(p(4)), '\r\n']);
            fprintf(fileID,'%1.15e\t%1.15e\t%1.15e\t%1.15e\r\n',p(1),p(2),p(3),p(4));
            p=p(5:end);
        end
        if p~=0
            for j=1:length(p)
                fprintf(fileID,'%1.15e\t', p(j));
            end
            fprintf(fileID,'\r\n');
        end
    
    end
end


Sunday, November 2, 2014

DIY rocket igniters

Introduction

For a side project at work, we needed to develop a consistent method of igniting our hybrid rocket motors.  After a bit of poking around, I decided to pursue igniters, and I'm sharing some of the results of my findings here.

Scroll down to the bottom if you want to see the video first.

Warning - DANGER!

Hopefully everyone is aware that playing with gunpowder and rocket igniters is dangerous.  I recommend only doing this is you are comfortable handling explosives and you have someone supervising (regardless of your age).  Also, please wear safety glasses!

How to make

I used this website to help me get started, and I recommend reading through if you are at all interested in making your own igniters.

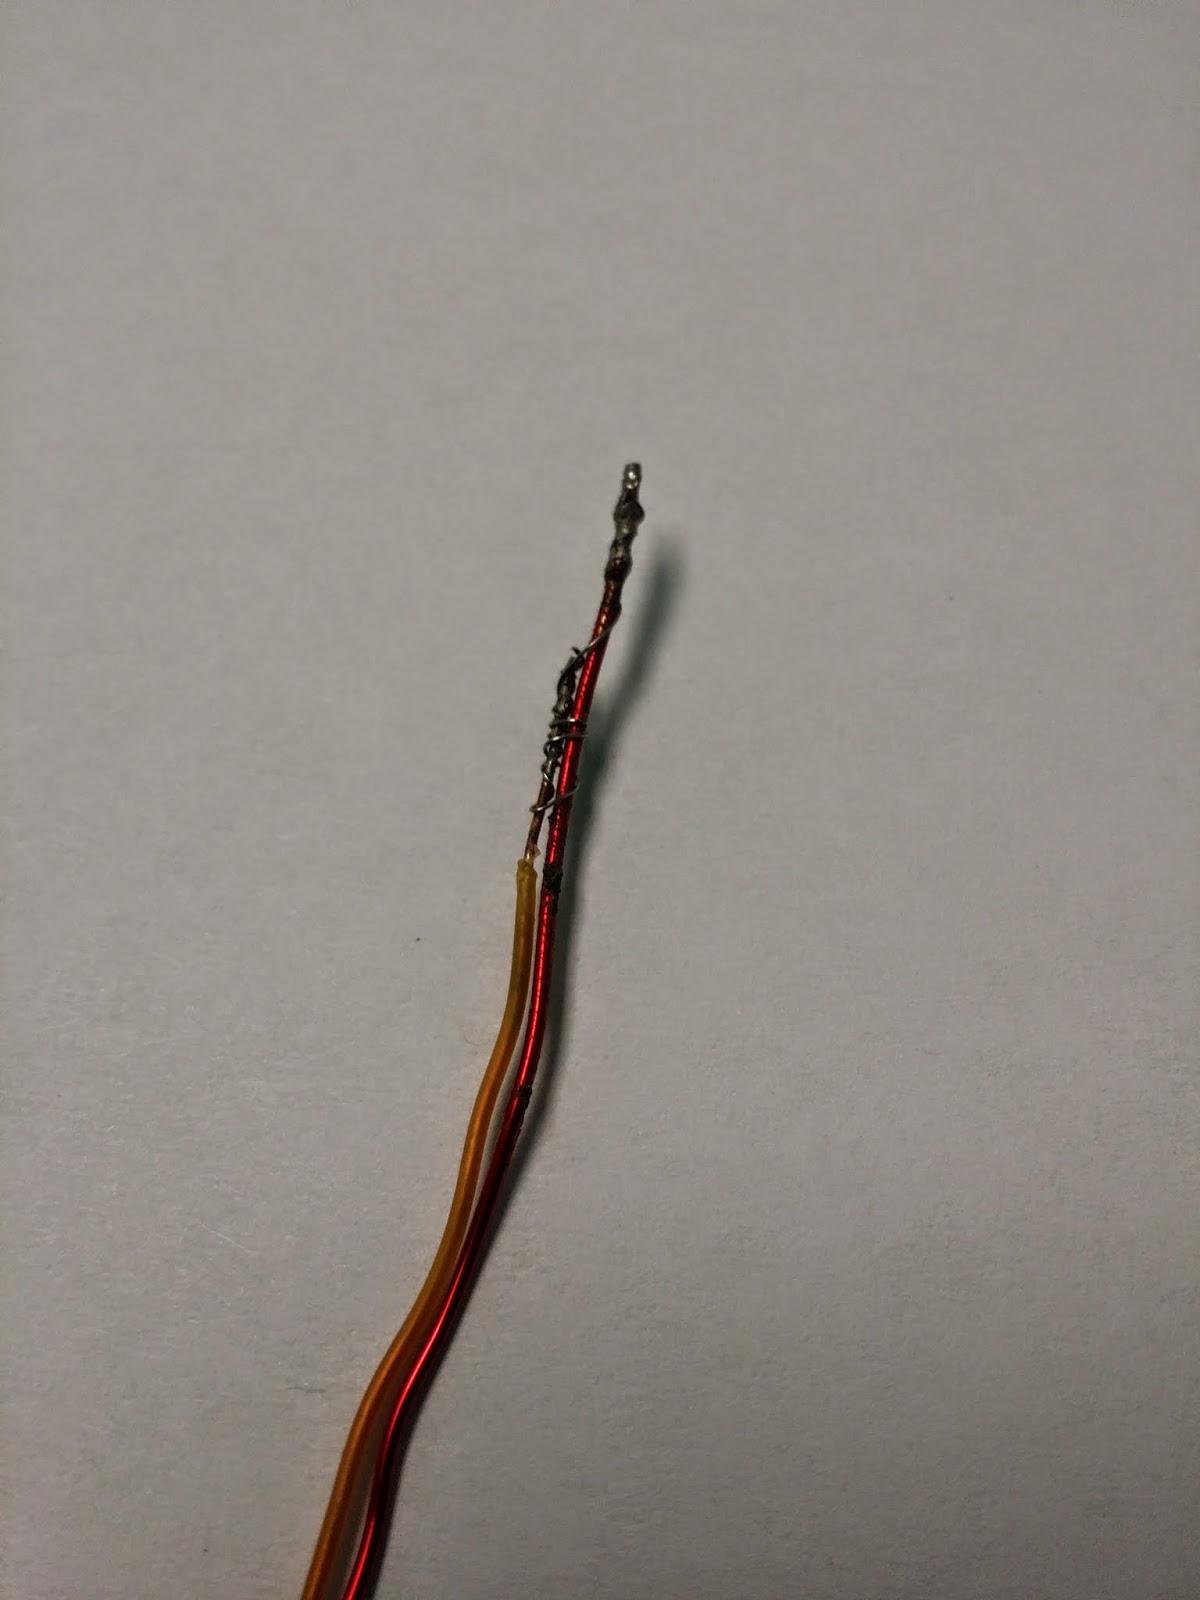
Step one is the prepare the wires.  Start with two wires of similar lengths.  I'm using a small 24 gauge wire (orange) and a larger magnet wire (red) as shown in Figure 1. The magnet wire is very stiff and should hopefully shoot out the rocket nozzle without clogging it after it ignites.  Take the wires, strip the ends, and place them in parallel.  Also, make sure that the magnet wire sticks out a little past the smaller wire (Figure 1) and that the exposed portions of the two wires CANNOT make contact.  Take a very small diameter wire (I used Nichrome but copper will work too), wrap one end around the exposed magnet wire and the other end around both the magnet wire (which is protected with insulation) and the exposed 24 gauge wire.  Solder both ends.  Checks the resistance (with an ohm-meter) of the wire, and it should be under 1 ohm (but not zero).  The previous website I mentioned also does describes this process.

Figure 1.  The prepared ingiter wire prior to dipping in the pyrogen.  

The next step is to mix 3 ping pong balls (must be made of nitrocellulose or NC) with 4+ ounces of acetone in a sealed container (I used a mason jar).  I then waited 24 hours for the ping pong balls to dissolve in the acetone (if it doesn't dissolve, you bought knock-off ping pong balls that are not made of NC) .  When it was done, all of the solid had gone away, and I was left with a liquid a little more viscous than water.   This step makes your NC lacquer which acts as a combustible binding agent for your later additives (gunpowder, etc).

Figure 2.  Mix 3 ping pong balls (front-right) in 4+ ounces of acetone (back-right) in a sealed container (left).  Wait 24 hours.

Step three is to grind your gunpowder into a fine powder.  I'm using American Pioneer Powder - FFFG granulated black powder.  Add the granulated powder to a mortar and pestle and grind until the powder stops getting smaller.

Figure 3.  Grind your blackpowder into a fine powder.  The gunpowder shown here has not been ground enough.  

Next step is to mix the lacquer with your gunpowder.  I poured about 5-10 milliliters into a plastic mixing cup and slowly added ground black powder until the mixture was thick but still a fluid paste.  This forms the pyrogen. Practice will help you quickly determine the right viscosity.  Also, either add a little magnesium to the pyrogen now (and mix) or sprinkle it on the final product while it's drying (in the next step).

Figure 4.  Mix the lacquer (right) with finely ground black powder (middle) in a mixing cup (front right).  Either add (and mix)  a little magnesium powder now or wait for the next step.

Next, dip your prepared igniter wire into the pyrogen, extract, and allow to dry.  Move quickly because the acetone quickly evaporates from the pyrogen, and the mixture in the cup has already started to harden.  The viscosity of the pyrogen will determine how thick of a coating of a coating will form on the wire, and this is important because your rocket's throat diameter may limit the size of your igniter.  If you haven't already mixed the magnesium powder into the pyrogen, sprinkle some onto the drying igniter.  The following figure shows my final product.

Figure 5.  Final igniter product.  

The magnesium in the previous steps burns at a hotter temperature than the blackpowder alone, and it also throws out large sparks.  In theory, these two facts should provide a higher chance to light your rocket motor.

Firing

The following video shows the igniter firing.  Notice that sparks (the burning magnesium) that jumps from the ingiter while it's burning.  The sparks are also shown in Figure 6 below.


Figure 6.  The magnesium powder in the igniter throws out very hot sparks during combustion and should improve the chance of a successful ignition.